
TextSanity WordPress Plugin for SMS Marketing
TextSanity recently released a WordPress plugin. The plugin helps you keep doing the awesome things you’re already doing with TextSanity: engaging customers and clients through text message marketing.
In this post we will cover how the new plugin works, how to install it, as well as four widgets the plugin can be used on your website. Let’s get started!
How the TextSanity WordPress Plugin works
The TextSanity WordPress plugin is simple to understand – especially if you’re already a
TextSanity customer. When the plugin is installed properly, the plugin will ask for a customer who comes to your site for their phone number. Once, the number is entered, they receive a thank you message and a reminder to check their phone.
When they do, they’ll discover that you’ve sent them a text message; one that you’ve previously set for this express purpose. As the customer engages with the message, all of the details are sent automatically to your TextSanity account.

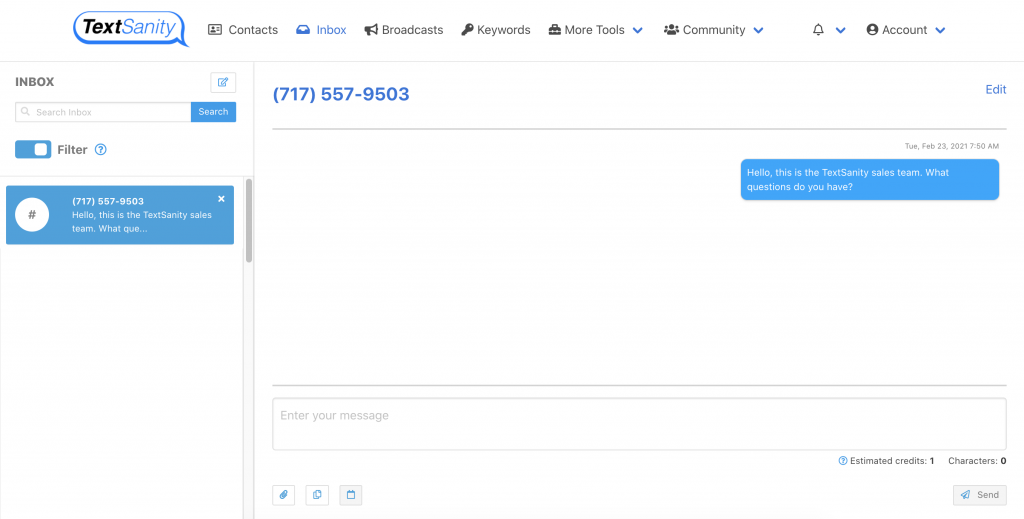
There, you can respond to their messages one-on-one, as always. We recommend assigning someone from your sales or service team to watch your account for these incoming messages.
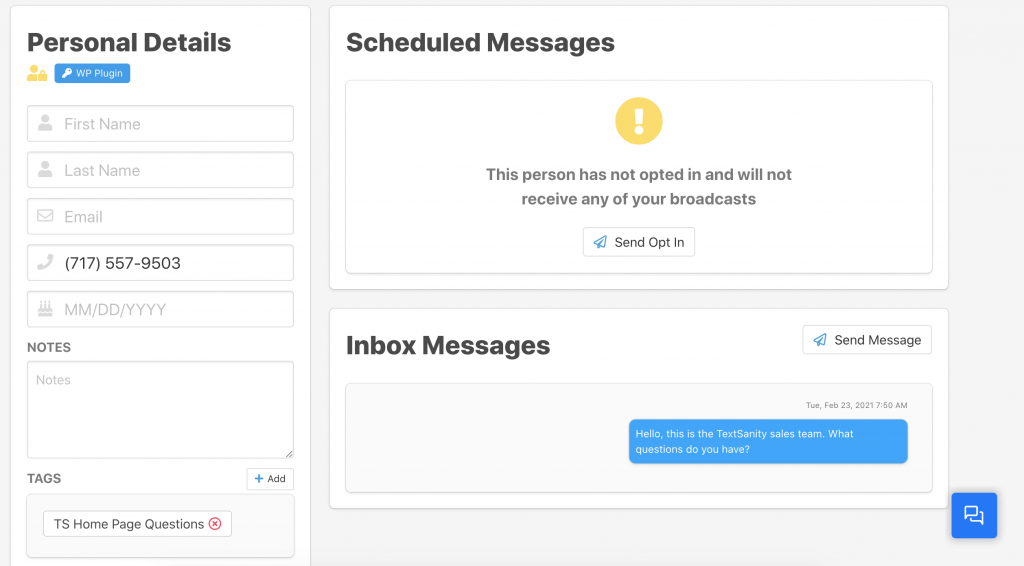
Depending on where you place and how you use the TextSanity WordPress plugin, you’ll need to interact with the customers right away in order to preserve the sale and help customers with their immediate needs.
How to install the TextSanity WordPress plugin
Installing the TextSanity WordPress plugin is easy. In just 10 simple steps, you’re ready to go.
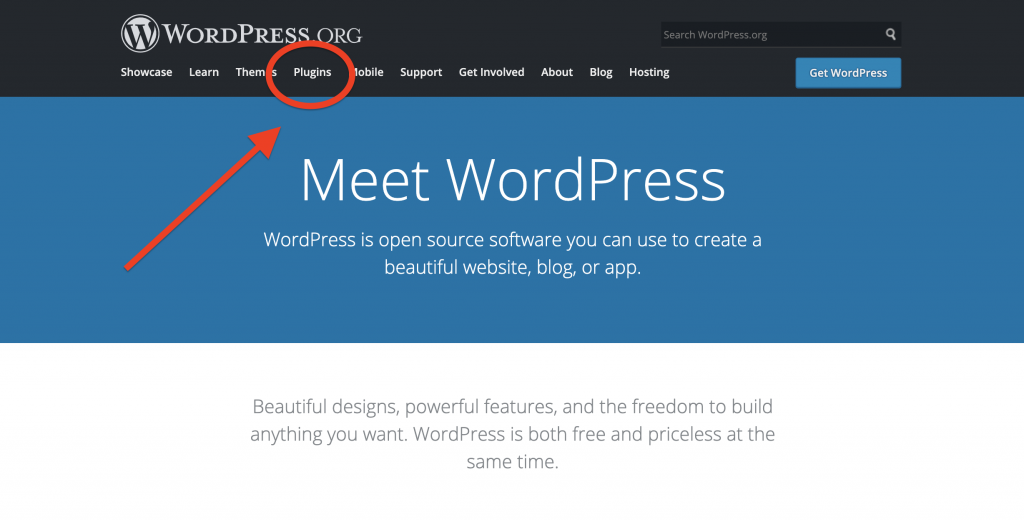
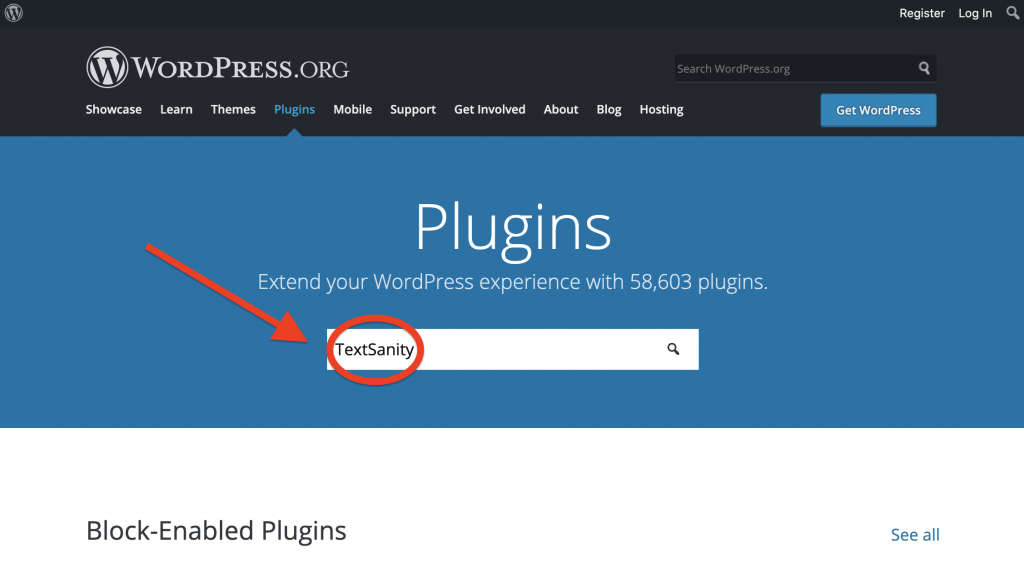
Step 1: Navigate to your WordPress.org page and click on “Plugins” at the top of the page.
Step 2: Type “TextSanity” into the search plugins bar and click enter.
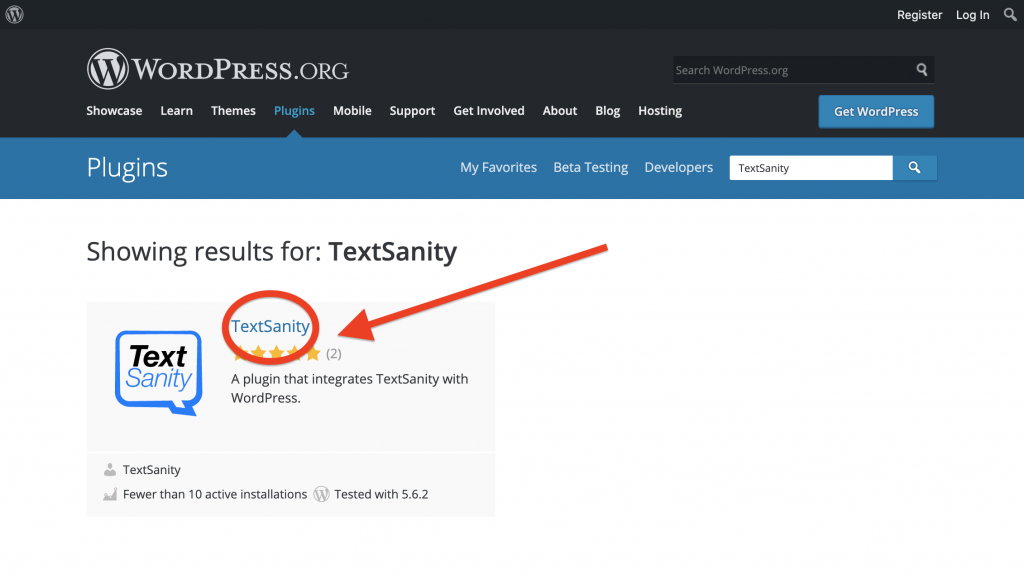
Step 3: Click on the TextSanity plugin that populates.
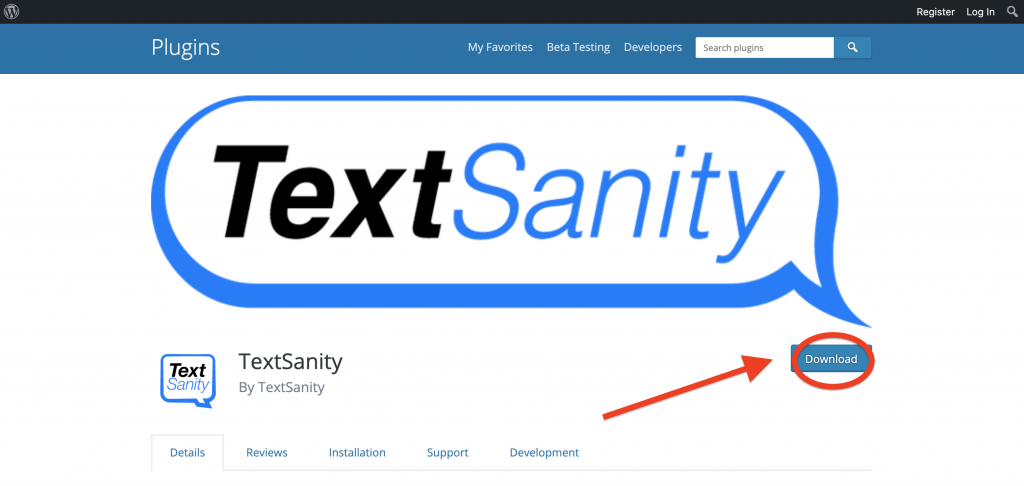
Step 4: Click download on the right side of the page.
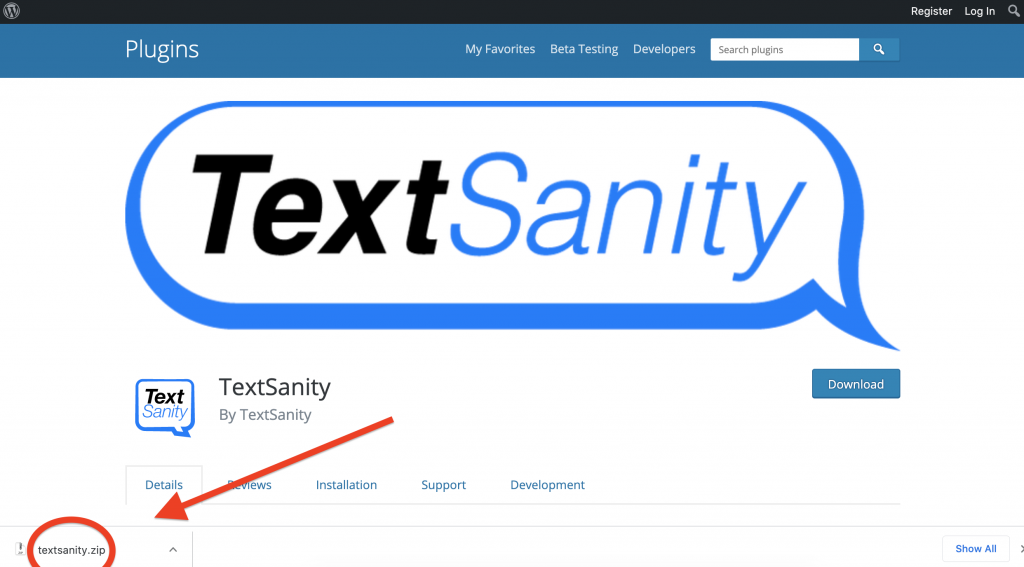
Step 5: Open the zip file and proceed to install.
Step 6: Once installation is complete, go to your WordPress website and login.
Step 7: TextSanity’s plugin is now featured on the left side of the screen of your website’s main page after login.
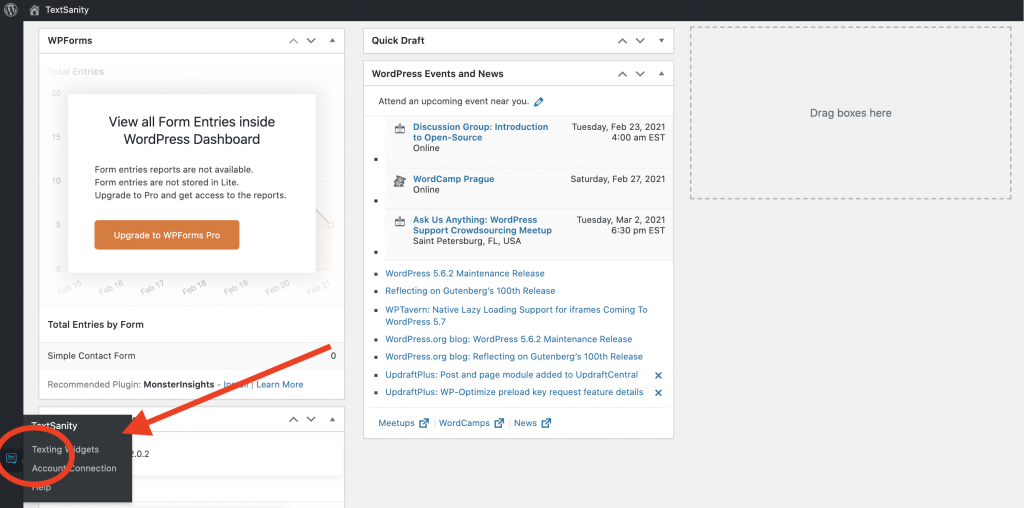
Step 8: Click on the plugin and click activate.
Step 9: Connect your existing TextSanity account.
Step 10: Start reaching customers using text message marketing on your website.
TextSanity WordPress Plugin Widgets
There are four main widgets to the TextSanity WordPress plugin. Each is described by their function or where they appear on your site. They are: banners, popups, chat, and inline.
This section covers each widget, set up, and uses.
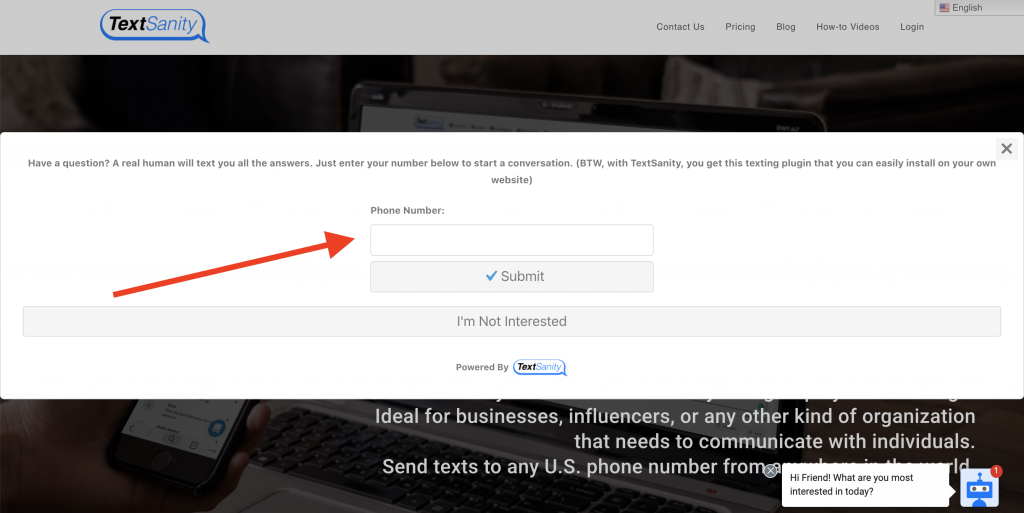
1. Banners (top or bottom)
Banners appear at the top or bottom or both of any page on your site. These go across the entire section of the page and are perfect for customer service inquiries. As with all the widgets we will discuss, they are incredibly simple to set up.

Follow these steps to set up a TextSanity WordPress banner widget:
-
Navigate to your TextSanity WordPress plugin on the left hand side of your WordPress site page.
-
At the top of the page, it will say Texting Widgets. Next to that, click the button “Add New”.
-
Add a title (such as ‘Banner Top – Pricing Page’) for your reference. No one else will see it except you.
-
Then, fill out the relevant details in the ‘Details’ section
-
Make sure ‘Enabled’ is checked. If not, even if you save the widget, it will not appear on your site.
-
Under ‘Position’, choose ‘Banner – Top’ or ‘Banner – Bottom’. **If you want to add a top and bottom banner to a page, you need to create a separate widget for both.
-
Choose the page you want the banner to show up on. **Selecting sitewide means that the banner will show up on each page of your site.
-
Under ‘Type’, you can choose from an ‘Individual Text Conversation’, ‘Opt-in Response’, and ‘Keyword Campaign’
-
Individual Text Conversation – Starts a conversation with the person in your TextSanity account inbox. You’ll need to select how the conversation is tagged under in ‘Tags’.
-
Opt-in Response – Adds the person to your text marketing list.
-
Keyword Campaign – Starts sending them the flow of a previously configured text message keyword campaign you’ve set.
-
-
Compose a message, description, and thank you message.
-
The message will appear in the banner as the person inputs their phone number.
-
The description will help the person know what they are signing up for.
-
The thank you message displays once a person has entered their number and clicked ‘Submit’.
-
-
Leave ‘Advanced: Do Not Style’ unchecked. **If you’d like to style the banner a different way, check the box. However, you’ll need your website developer to write the code for the styling.
-
Most important, click ‘Save’ at the top right hand side of the page.
-
Now your banner widget is live and ready to start text marketing for you.
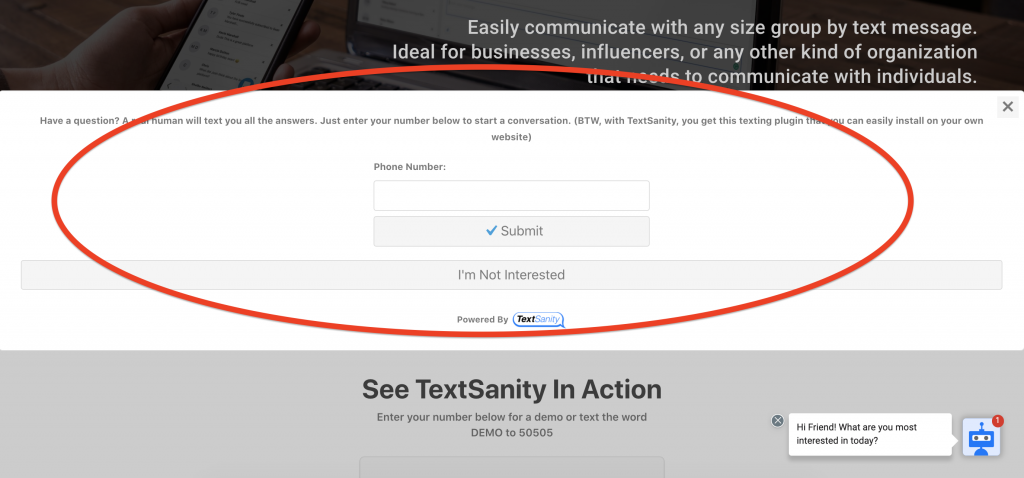
2. Popups
Popups appear within a few seconds of a page being opened. They can be on any page on your site. These popups are perfect for customer service inquiries, opt-in messages, coupon codes, and the list goes on. As with all the widgets, they are incredibly simple to set up.
Follow these steps to set up a TextSanity WordPress popup widget:
-
Navigate to your TextSanity WordPress plugin on the left hand side of your WordPress site page.
-
At the top of the page, it will say Texting Widgets. Next to that, click the button “Add New”.
-
Add a title (such as ‘Popup – Pricing Page’) for your reference. No one else will see it except you.
-
Then, fill out the relevant details in the ‘Details’ section
-
Make sure ‘Enabled’ is checked. If not, even if you save the widget, it will not appear on your site.
-
Under ‘Position’, choose ‘Popup’.
-
Choose the page you want the popup to show up on. **Selecting sitewide means that the popup will show up on each page of your site.
-
Under ‘Type’, you can choose from an ‘Individual Text Conversation’, ‘Opt-in Response’, and ‘Keyword Campaign’
-
Individual Text Conversation – Starts a conversation with the person in your TextSanity account inbox. You’ll need to select how the conversation is tagged under in ‘Tags’.
-
Opt-in Response – Adds the person to your text marketing list.
-
Keyword Campaign – Starts sending them the flow of a previously configured text message keyword campaign you’ve set.
-
-
Compose a message. The message will appear in the popup as the person inputs their phone number.
-
Under ‘Popup Display Delay in Seconds’, input the numerical digit of seconds you want to pass before the popup appears when someone navigates to the page.
-
Compose a description and thank you message.
-
The description will help the person know what they are signing up for.
-
The thank you message displays once a person has entered their number and clicked ‘Submit’.
-
-
Leave ‘Advanced: Do Not Style’ unchecked. **If you’d like to style the popup a different way, check the box. However, you’ll need your website developer to write the code for the styling.
-
Most important, click ‘Save’ at the top right hand side of the page.
-
Now your popup widget is live and ready to start text marketing for you.
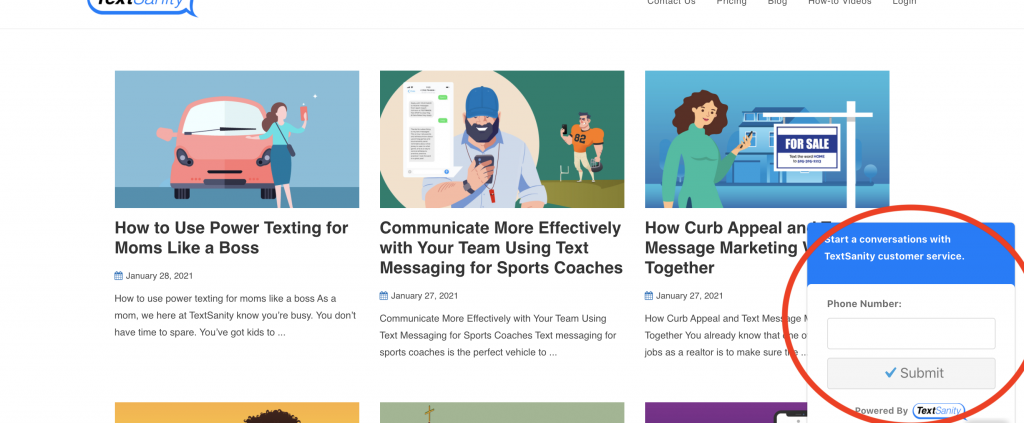
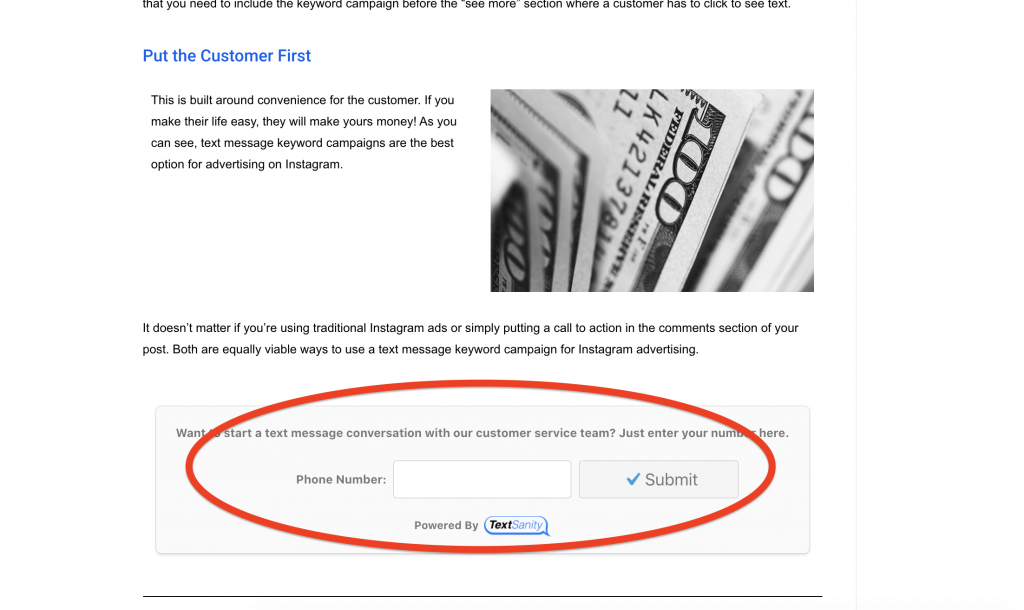
3. Chat
Chats appear within a few seconds of a page being opened. They can be on any page on your site. These are perfect for customer service inquiries as it starts a live conversation with the person. As with all the widgets we will discuss, chats are incredibly simple to set up.
Follow these steps to set up a TextSanity WordPress chat widget:
-
Navigate to your TextSanity WordPress plugin on the left hand side of your WordPress site page.
-
At the top of the page, it will say Texting Widgets. Next to that, click the button “Add New”.
-
Add a title (such as ‘Chat – Pricing Page’) for your reference. No one else will see it except you.
-
Then, fill out the relevant details in the ‘Details’ section
-
Make sure ‘Enabled’ is checked. If not, even if you save the widget, it will not appear on your site.
-
Under ‘Position’, choose ‘Chat’.
-
Choose the page you want the chat to show up on. **Selecting sitewide means that the chat will show up on each page of your site.
-
Under ‘Type’, you can choose from an ‘Individual Text Conversation’, ‘Opt-in Response’, and ‘Keyword Campaign’
-
Individual Text Conversation – Starts a conversation with the person in your TextSanity account inbox. You’ll need to select how the conversation is tagged under in ‘Tags’.
-
Opt-in Response – Adds the person to your text marketing list.
-
Keyword Campaign – Starts sending them the flow of a previously configured text message keyword campaign you’ve set.
-
-
Compose a message. The message will appear in the chat as the person inputs their phone number.
-
Choose your preference for background and text color, or leave as is.
-
Check ‘Show Chat Popup Automatically’ **Leaving this unchecked causes your chat to not show up on the page.
-
Under ‘Chat Popup Delay’, input the numerical digit of seconds you want to pass before the chat appears when someone navigates to the page.
-
Add a description and thank you message.
-
The description will help the person know what they are signing up for.
-
The thank you message displays once a person has entered their number and clicked ‘Submit’.
-
-
Leave ‘Advanced: Do Not Style’ unchecked. **If you’d like to style the chat a different way, check the box. However, you’ll need your website developer to write the code for the styling.
-
Most important, click ‘Save’ at the top right hand side of the page.
-
Now your chat widget is live and ready to start text marketing for you.
4. Inline
The inline widget appears wherever you put it in the code of a page. Using this widget will populate a short code that you enter into the code of your website. These are most useful inside of text bodies where they can be used to opt-in customers quickly or put a customer on a specific text message keyword campaign. As with all the widgets, they are incredibly simple to set up.
Follow these steps to set up a TextSanity WordPress inline widget:
-
Navigate to your TextSanity WordPress plugin on the left hand side of your WordPress site page.
-
At the top of the page, it will say Texting Widgets. Next to that, click the button “Add New”.
-
Add a title (such as ‘Inline – Pricing Blog Post’) for your reference. No one else will see it except you.
-
Then, fill out the relevant details in the ‘Details’ section
-
Make sure ‘Enabled’ is checked. If not, even if you save the widget, it will not appear on your site.
-
Under ‘Position’, choose ‘Inline’.
-
Under ‘Type’, you can choose from an ‘Individual Text Conversation’, ‘Opt-in Response’, and ‘Keyword Campaign’
-
Individual Text Conversation – Starts a conversation with the person in your TextSanity account inbox. You’ll need to select how the conversation is tagged under in ‘Tags’.
-
Opt-in Response – Adds the person to your text marketing list.
-
Keyword Campaign – Starts sending them the flow of a previously configured text message keyword campaign you’ve set.
-
-
Compose a message, description, and thank you message.
-
The message will appear inline as the person inputs their phone number.
-
The description will help the person know what they are signing up for.
-
The thank you message displays once a person has entered their number and clicked ‘Submit’.
-
-
Leave ‘Advanced: Do Not Style’ unchecked. **If you’d like to style the inline widget a different way, check the box. However, you’ll need your website developer to write the code for the styling.
-
Most important, click ‘Save’ at the top right hand side of the page.
-
Now your inline widget is live and ready to start text marketing for you.
Download the TextSanity WordPress Widget
TextSanity WordPress plugin is an extremely simple way for you to connect with your customers using text message marketing. So, go ahead and try it out today!